 Save to Pinterest
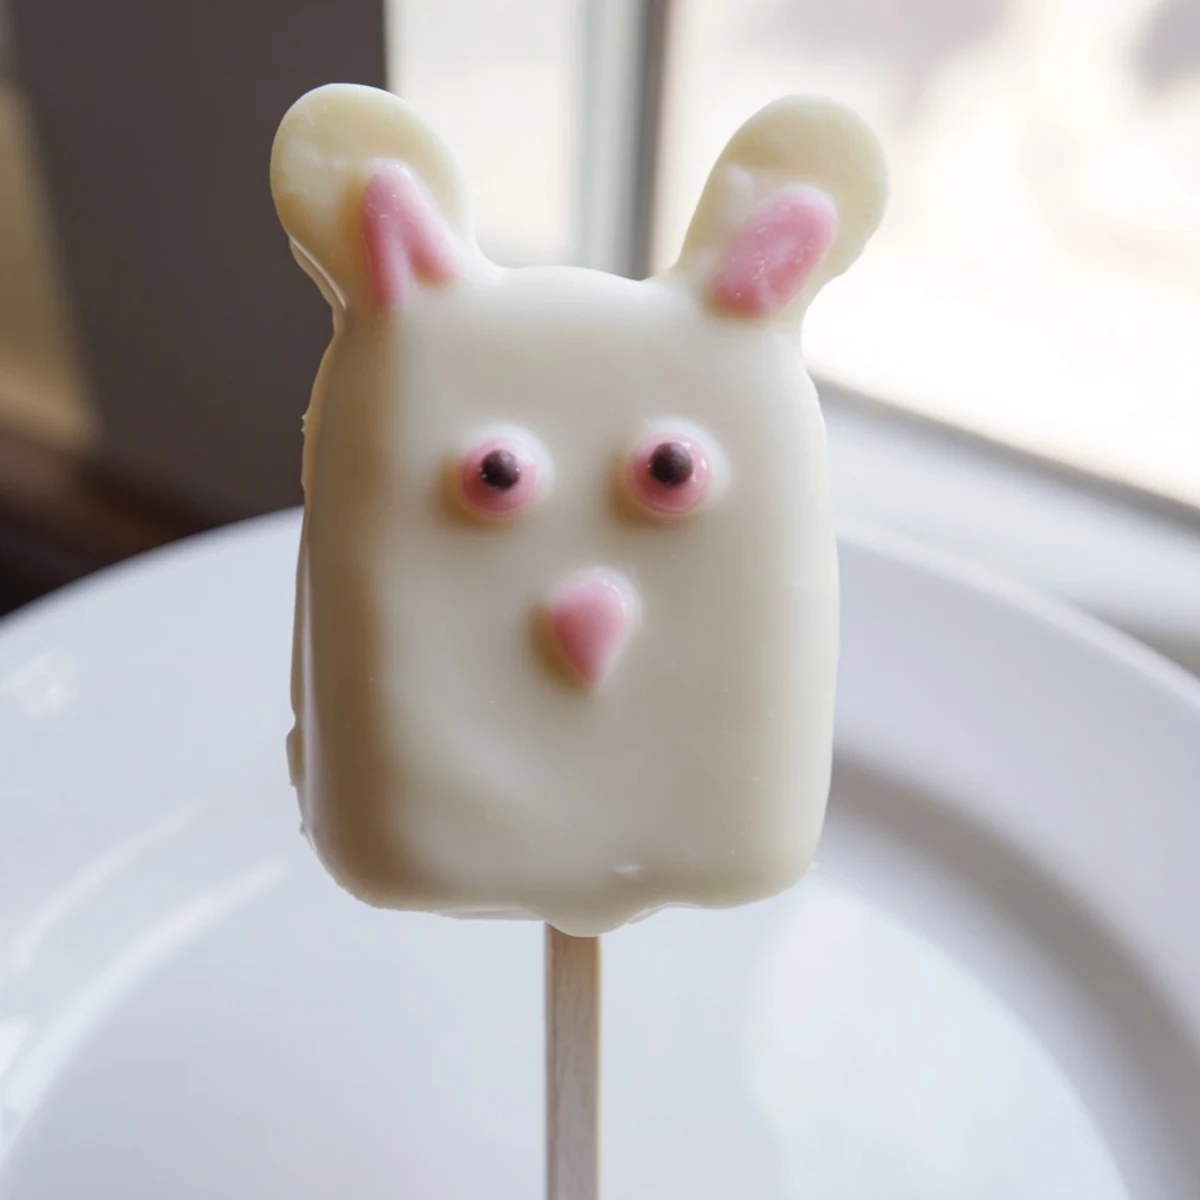
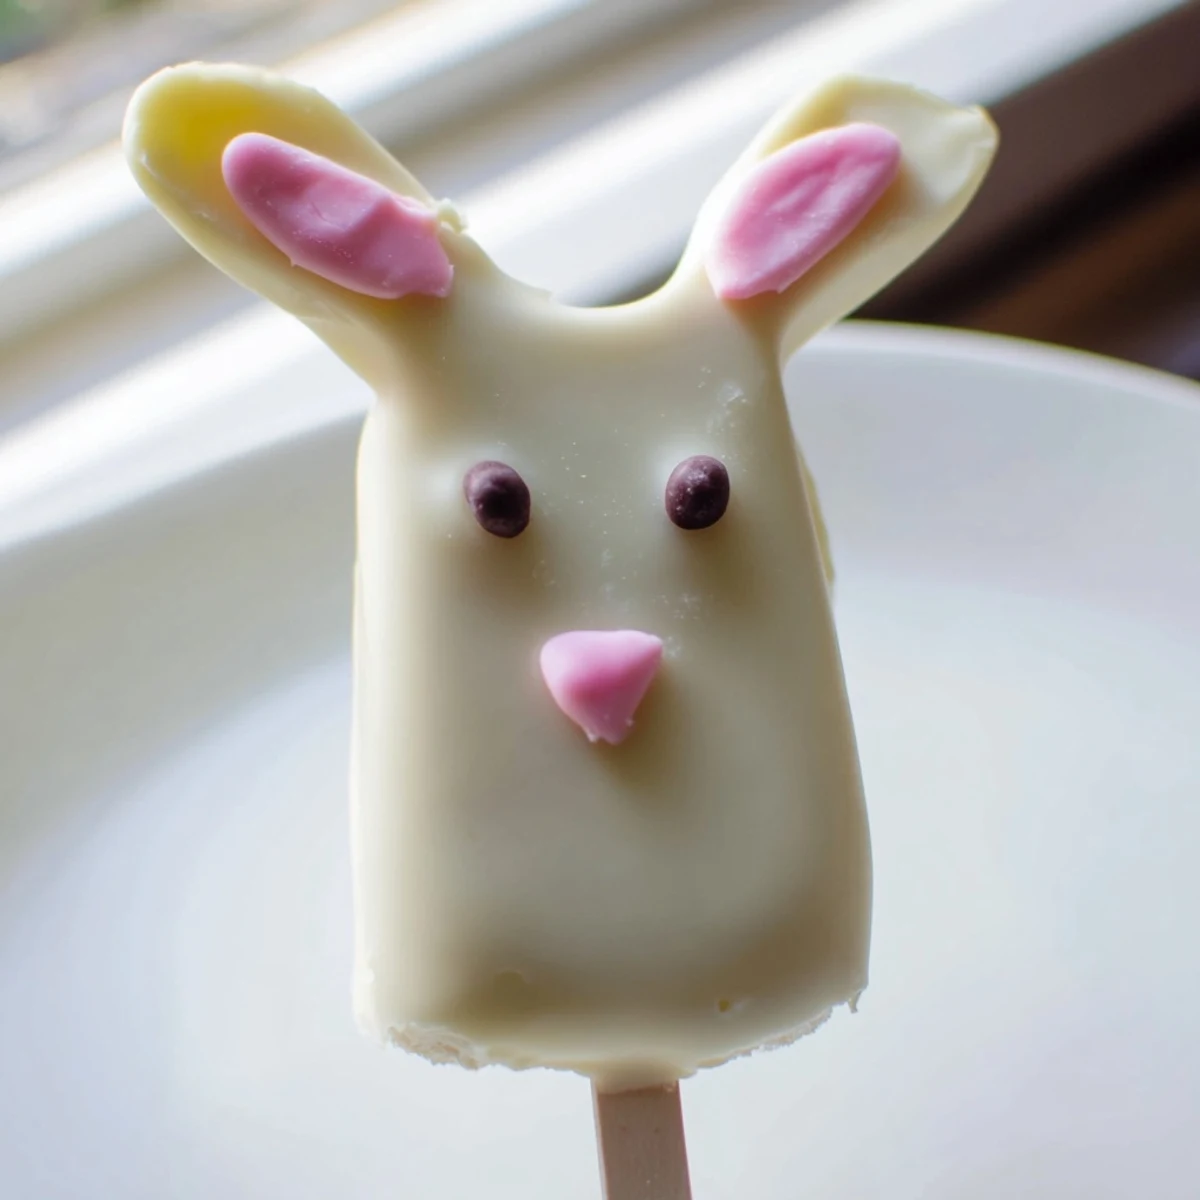
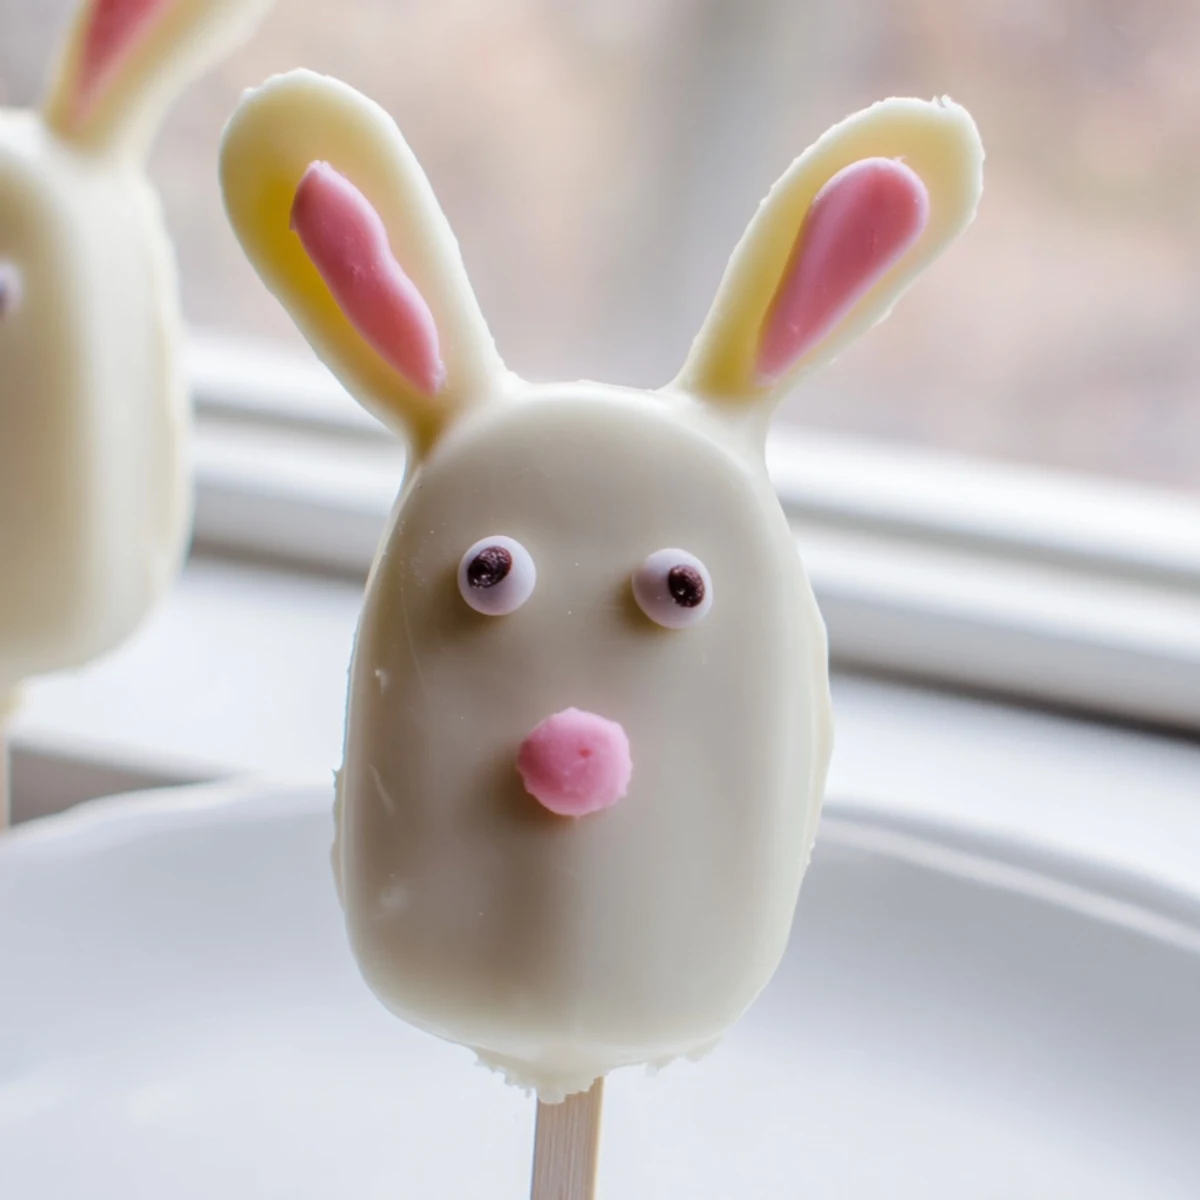
 These delightful bunny-shaped treats combine moist vanilla cake crumbs with a smooth white chocolate coating, creating the perfect festive dessert for your Easter celebration. The adorable design features candy eyes, colorful ears, and playful decorations that make them irresistible to both children and adults.
Preparation takes just 25 minutes of active work, plus chilling time, making these manageable even for busy holiday schedules. Each cakesicle balances the richness of white chocolate with the familiar comfort of vanilla cake, while the stick format makes them easy to serve and enjoy.
Customize your bunnies with different colored ears, playful sprinkles, or marbled chocolate effects. They store beautifully for up to three days, allowing you to prepare ahead for your Easter gathering or spring parties.
The first Easter I made these, my kitchen looked like a pastel explosion had gone delightfully wrong. I was attempting to impress my nieces with something more exciting than the usual dyed eggs, and somewhere between melting white chocolate for the third time and accidentally giving one bunny two noses, I realized the mess was half the fun. Now they request them every year, and I've learned that slightly imperfect bunnies have twice the personality anyway.
Last year I set up a decorating station for the kids, complete with bowls of sprinkles and edible googly eyes. Watching them debate whether bunnies should have pink noses or yellow ones while chocolate dripped onto the parchment paper reminded me that holidays are about creating these small joyful messes together. The best part was seeing their proud faces holding up their creations, lopsided ears and all.
Ingredients
- Vanilla cake crumbs: Use whatever cake you have on hand or bake a simple vanilla sheet cake specifically for crumbling
- Cream cheese and butter: Both must be softened to room temperature so they blend seamlessly into the crumbs without creating chunks
- Powdered sugar: Adds just enough sweetness to bind everything while keeping the texture smooth
- Vanilla extract: Pure vanilla extract makes a noticeable difference in the overall flavor depth
- White chocolate: High-quality white chocolate melts more smoothly and tastes less waxy than candy melts
- Cakesicle sticks: Insert these before chilling so the cake has time to grip the stick properly
- Decorations: Candy eyes, sprinkles, and fondant ears bring these bunnies to life
Instructions
- Prepare the cake mixture:
- Mix all the cake ingredients in a medium bowl until the mixture holds together when squeezed, adding another teaspoon of cream cheese if it feels too dry to shape properly.
- Shape your bunnies:
- Form the dough into flattened oval shapes, pressing gently to create a slight point at the top for what will become bunny ears, keeping the portions relatively uniform.
- Add the sticks and chill:
- Insert a cakesicle stick into each shape about halfway through, then place them on a parchment-lined tray and refrigerate until completely firm to the touch, which prevents them from falling apart during dipping.
- Melt the coating:
- Heat the white chocolate in 30-second intervals, stirring thoroughly between each burst, until it's completely smooth and fluid like heavy cream.
- Dip and tap:
- Dip each chilled cake straight down into the chocolate, lift it out while gently twisting to catch any drips, then tap the stick against the bowl edge to remove excess coating for an even finish.
- Add decorations quickly:
- While the chocolate is still wet, place candy eyes, press on fondant ears, and add sprinkles or a pink nose before the coating sets.
- Set completely:
- Let the cakesicles dry at room temperature for about 20 minutes or pop them in the fridge for 5-10 minutes if you're impatient like me.
- Final touches:
- Use food coloring pens to add whiskers or tiny mouths once the chocolate has fully hardened, then stand them upright in a jar to display.
 Save to Pinterest
 My sister still talks about the year I made a whole basket of these for her birthday instead of Easter, simply because she loves bunnies that much. Seeing her face light up when she opened the box filled with these little chocolate-dipped faces made me realize some traditions deserve to be celebrated year-round, not just on their assigned holidays.
Getting The Shape Right
I've found that pressing the cake mixture gently with the palm of my hand creates the most natural oval shape, and using my thumb to indent two spots at the top helps guide where the ears should go. Don't worry if they're not perfectly symmetrical—bunnies, like people, have character in their imperfections.
Making Them Ahead
You can shape the cake mixture and insert the sticks up to two days in advance, storing them tightly wrapped in the refrigerator. Just let them come to room temperature for about 15 minutes before dipping, as cold cake can cause the warm chocolate to seize and create streaks in your coating.
Decoration Ideas That Work
Beyond the classic candy eyes, try using pink pearl sprinkles for noses, or roll the edges in pastel nonpareils while the chocolate is still wet for a festive border effect. I've also used heart-shaped sprinkles sideways as ears, and pressed shredded coconut into the bottom half before the chocolate sets to look like fluffy bunny tails.
- Keep a bowl of warm water nearby to dip your fingers in when pressing decorations—it prevents sticking without adding extra moisture
- If your white chocolate is too thick for smooth dipping, stir in a teaspoon of coconut oil or vegetable shortening to thin it out
- Work with just 2-3 cakesicles at a time when decorating so the chocolate doesn't set before you can add the finishing touches
 Save to Pinterest
 There's something genuinely wonderful about biting through crisp white chocolate into soft cake, especially when it's shaped like a bunny and made with people you love. These little treats have become the signature dessert I'm most proud to share each spring.
Recipe FAQs
- → What makes these different from regular cake pops?
-
The flat, oval shape resembles a bunny face rather than a round sphere, and the larger size makes them more substantial. The stick placement creates a stable base for decorating with expressive features like ears, noses, and eyes.
- → Can I make these ahead of time?
-
Yes, store finished cakesicles in an airtight container in the refrigerator for up to 3 days. The white chocolate coating helps keep the cake inside fresh and moist. Bring to room temperature 15 minutes before serving.
- → What type of cake works best for the crumb mixture?
-
Vanilla cake provides a neutral base that pairs perfectly with white chocolate, but you can use chocolate, lemon, or even funfetti cake crumbs. Homemade or store-bought cupcakes work equally well—just ensure they're completely crumbled.
- → How do I prevent the white chocolate from seizing when melting?
-
Melt in short 30-second bursts, stirring thoroughly between each interval. Avoid getting any moisture into the chocolate, as even a few drops can cause seizing. If it becomes too thick, add a teaspoon of vegetable oil to smooth it out.
- → What decorating options work best for bunny features?
-
Fondant or modeling chocolate create clean, defined ears and noses. Candy eyes add instant personality, while edible gel food coloring lets you paint pink noses and whiskers. Pretzel sticks make adorable ear inserts, and sprinkles add festive texture.
- → Can I use candy melts instead of real white chocolate?
-
Absolutely—candy melts are often easier to work with since they're designed for coating and come in pre-colored options. They set firmly at room temperature and hold their shape well in warmer environments.